Building a Currency Converter using React Native

Project Overview and Learning Objectives
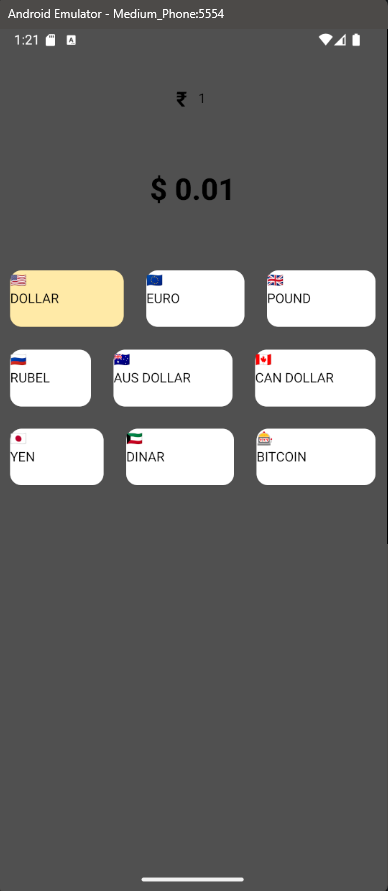
This mini-project allow user to enter an amount in one currency (Rupee) and convert it into others like Dollars, Euros and Pounds. The major objective is learning to use FlatList instead of ScrollView for rendering lists. The project emphasizes the use of TypeScript to provide a clear structure for the app's data and uses interface. With this approach it is easy to achieve type safety.
The projects also covers how to manage user interaction through React's useState hook to track the inputValue, resultValue, and targetCurrency
In this project, I have integrate react-native-snackbar library to provide trigger notifications.
Tip: Open the Source code and alongside read this blog which helps you to understand.
The complete source code is available at GitHub
At the end of the project, you will understand
Build reusable components
Managing states and Business logic
FlatList vs ScrollView
Performance optimization using FlatList
Project Setup and Organization
Create dedicated src folder and move the app.tsx into this folder. Create TypeScript interface in index.d.ts.
The interface defines the mandatory properties for currency object used in the app. This ensures that every button or data point created follows a consistent structure
interface Currency {
    name: string;
    value: number;
    flag: string;
    symbol: string;
}
Rather than hard-coding data directly into the UI components, the project uses a constants.ts file. Storing data this way allows the developer to easily add more currencies in the future without modifying the core logic of the app
export const currencyByRupee: Currency[] = [
    {
      name: 'DOLLAR',
      value: 0.012271428,
      flag: '🇺🇸',
      symbol: '$',
    },
    {...},{....}
}
A specific component, CurrencyButton.tsx, is created to handle the rendering of individual currency items
import { View, Text, StyleSheet } from 'react-native'
import React from 'react'
import type { PropsWithChildren } from 'react'

type CurrencyButtonProps=PropsWithChildren<{
    name:string,
    flag:string
}>

const CurrencyButton = (props:CurrencyButtonProps) => {
  return (
    <View>
      <Text>{props.flag}</Text>
      <Text>{props.name}</Text>
    </View>
  )
}

export default CurrencyButton
Building Reusable Components
For the CurrencyButton component
PropsWithChildren ensure the data passed to the component matches specific types. whenever the component is used, it follows a strict interface, preventing errors caused by missing or incorrect data types.
type CurrencyButtonProps=PropsWithChildren<{
    name:string,
    flag:string
}>

const CurrencyButton = (props:CurrencyButtonProps) => {
  return (
    <View>
      <Text>{props.flag}</Text>
      <Text>{props.name}</Text>
    </View>
  )
}
Managing State and Business Logic
The app tracks three main pieces of information using states to notify the system when the UI needs to be updated inputValue, resultValue, targetCurrency. When a user selects a currency from the list, the buttonPressed function is triggered, carrying the data of the selected currency (of type Currency)
The app performs two critical checks to prevent crashes:
Empty Check: If the
inputValueis empty, a Snackbar notification pops up with the message "Enter a value to convert".Numeric Validation: The string input is converted to a number using
parseFloat. If the resulting value is not a valid number (isNaN), a Snackbar displays "Not a valid number to convert"
After the calculation is complete, the state is updated to reflect the changes on the screen. Here I have separated business logic from the UI components.
  const [inputValue,setInputValue]=useState('');
  const [resultValue,setResultValue]=useState('');
  const [targetCurrency,setTargetCurrency]=useState('');

  function buttonPressed(targetValue:Currency){
    if(!inputValue){
      return Snackbar.show({
        text: "Enter a value to convert",
        backgroundColor: "#EA7773",
        textColor: "#000000"
      })
    }
    const inputAmount=parseFloat(inputValue);
    if(!isNaN(inputAmount)){
      const convertedValue=inputAmount*targetValue.value;
      const result=`\({targetValue.symbol} \){convertedValue.toFixed(2)}`;
      setResultValue(result);
      setTargetCurrency(targetValue.name)
    }
    else{
      return Snackbar.show({
        text: "Not a valid number to convert",
        backgroundColor: "#F4BE2C",
        textColor: "#000000"
      })
    }
  }
Implementing FlatList for Performance
FlatList is more performance-optimized because it only renders items currently visible on the screen, consuming less memory.
Props for Efficiency
data: This prop identifies the source of informationkeyExtractor: It is important for performance. It provides a unique identifier (likeitem.name) for every item in the list, allowing React to efficiently track and update only the specific elements that change.renderItem: This prop defines the UI for each item in the list. It takes an individual item from your data and returns a component, such as a Pressable button or a customCurrencyButton.
To make the list functional, wrap the rendered items in a Pressable component: The onPress event triggers the buttonPressed function, passing the specific data for that currency (the item) to calculate the conversion.
<FlatList
          numColumns={3}
          data={currencyByRupee}
          keyExtractor={item=>item.name}
          renderItem={({item}) => (
            <Pressable
            style={[
              styles.button,
              targetCurrency === item.name && styles.selected
            ]}
            onPress={() => buttonPressed(item)}
            >
              <CurrencyButton {...item} />
            </Pressable>
          )}

        />


